Wednesday, August 27, 2014

How to download Java 8 or JDK 8 in Linux using WGET command

Just want to make it short: If you're using a Linux that does not have UI and want to download Java 8 or JRE 8 just follow the command below:

wget --no-check-certificate --no-cookies - --header "Cookie: oraclelicense=accept-securebackup-cookie" "http://download.oracle.com/otn-pub/java/jdk/8u20-b26/jre-8u20-linux-x64.tar.gz"

The command I listed above will simply download the Server JRE 8. You can change the URL location if you want to download a different version of JDK. To get the actual URL for the download location, open an internet browser and enter the URL "http://www.oracle.com/technetwork/java/javase/downloads/jre8-downloads-2133155.html" and right click on the download file that you want to download then click "Copy link address"

Thursday, June 26, 2014

Customized Maven Settings for Different Workspace - One Workspace Per Project

I've been looking for a solution on how to customized the maven settings for different project but there was none. So, I've created my own solution on this blog on how to do it, instead of customizing each project, I basically configure it on each workspace. My practice is one workspace for each project. This is what I have done so far:

Step 1: 
  • Open Eclipse or Springsource Tool Suite (STS) IDE
Step 2: 
  • Click Window - Preferences
Step 3: 
  • In Filter box, enter "Maven"
Step 4: 
  • Click the Installation and add the Maven home that you have in your computer. In my case I downloaded Maven 3.2.1 then extracted the TAR.GZ file to C:\Devtools\Apache\Maven\3.2.1
Step 5: 
  • Click User Settings then Browse the settings.xml file. In my case the location of the settings.xml is C:\Devtools\Apache\Maven\3.2.1\conf\settings.xml then click Update Settings and click Apply then Click OK.
That's it. That's my 5 easy steps.

Regarding changing the path of your local repository, you need to add the following code inside the settings.xml file from our maven conf directory:

<localRepository>D:/Devtools/Maven/Repository</localRepository>


Tuesday, April 1, 2014

Patching CVE-2014-0160 on your Ubuntu Linux using OpenSSL for your HTTP Server

For Ubuntu 12.04 SSL version - You need to patch this version to use the latest OpenSSL. On my server, the OpenSSL version was built on July 3 2012. I provide a simple and straightforward solution below: command: openssl version -a OpenSSL 1.0.1 14 Mar 2012 built on: Tue Jul 3 20:15:07 UTC 2012 platform: debian-amd64 Simple and straightforward solution. Issue the following command from your console or terminal: Step 1 -Update your Ubuntu command: sudo apt-get update Step 2 -issue a patch for the openssl command: sudo apt-get install -y libssl1.0.0 openssl Step 3 - Lets confirm the version of the openssl that you've just update command: openssl version -a built on: Mon Apr 7 20:33:29 UTC 2014 platform: debian-amd64 If you're using a web server (i.e. HTTP, IIS) with SSL enabled, all you need is just restart your web server and your web site is now safe.

Friday, March 28, 2014

Switch Java Version in Mac OS - Java 1.7.0_51

Why after installing a newer version of Java, it doesn't reflect immediately on your profile to use the right version?

Anyway, I have a simple solution on how to switch java in Mac OS. My Mac have different version of Java and I want to switch it anytime I want depends on the project that I'm working. Let's do it in 4 simple steps:


Step 1:(Check what is your current java version)
Enter the command:
   java -version
Output:
  java version "1.7.0_25"
  Java(TM) SE Runtime Environment (build 1.7.0_25-b15)
  Java HotSpot(TM) 64-Bit Server VM (build 23.25-b01, mixed mode)

Step 2: (Display all the installed Java from your Mac OS)
Enter the command:
  /usr/libexec/java_home -V
Output:
Matching Java Virtual Machines (5):
    1.8.0, x86_64: "Java SE 8" /Library/Java/JavaVirtualMachines/jdk1.8.0.jdk/Contents/Home
    1.7.0_51, x86_64: "Java SE 7" /Library/Java/JavaVirtualMachines/jdk1.7.0_51.jdk/Contents/Home
    1.7.0_25, x86_64: "Java SE 7" /Library/Java/JavaVirtualMachines/jdk1.7.0_25.jdk/Contents/Home
    1.6.0_65-b14-462, x86_64: "Java SE 6" /System/Library/Java/JavaVirtualMachines/1.6.0.jdk/Contents/Home
    1.6.0_65-b14-462, i386: "Java SE 6" /System/Library/Java/JavaVirtualMachines/1.6.0.jdk/Contents/Home

Step 3: (I will use the Java 1.7.0_51)
Enter the command:
  export JAVA_HOME=$(/usr/libexec/java_home -v 1.7.0_51)

Step 4:(Check what is your current java version after you execute the Step 3)
Enter the command:
   java -version
Output:
  java version "1.7.0_51"
  Java(TM) SE Runtime Environment (build 1.7.0_51-b13)
  Java HotSpot(TM) 64-Bit Server VM (build 24.51-b03, mixed mode)


Step 5:(Update your bash_profile)
Enter the command:
 sudo nano ~/.bash_profile
Add the following line or update the export JAVA_HOME line and the save it (CTRL X):
  export JAVA_HOME=$(/usr/libexec/java_home -v 1.7.0_51)


Tuesday, February 11, 2014

SpringSource Tool Suite 3.4.0 and Tomcat 8.0.1 - Unknown version of Tomcat was specified

The STS 3.4.0 latest release doesn't recognize the Tomcat 8.0.1 when adding it to a runtime server environment.

When adding the Tomcat 8 to Server Runtime Environment, you will encounter "Unknown version of Tomcat was specified." or "The Apache Tomcat installation at this directory is version 8.0.1.  A Tomcat 7.0 installation is expected."

I noticed that the last Apache Tomcat Version available in STS 3.4.0 environment is Apache Tomcat 7.

Anyway, you can make Tomcat 8.0.1 run in STS 3.4.0 by simple tweaking the ServerInfo.properties inside the catalina.jar folder. Please follow the simple steps below:

1) Open the catalina.jar using 7z in Windows.
2) Browse to org/apache/catalina/util
3) Open the ServerInfo.properties and replace or comment the 8.0.1 information to 7.0.47.A.RELEASE

Example:

From:
#server.info=Apache Tomcat/8.0.1
#server.number=8.0.1.0
#server.built=Jan 29 2014 11:13:21

To:
server.info=TC 8.0.1 to TC 7 Tweak/7.0.47.A.RELEASE
server.number=7.0.47.0
server.built=Oct 28 2013 08:15:22
4) Save the text then close the 7z.

That's it.

If you're using Mac and need more info, please leave a comment.

Monday, January 13, 2014

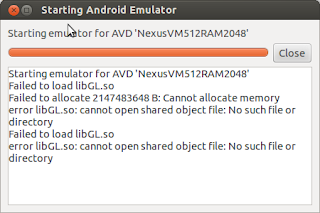
Failed to load libGL.so when running Android Emulator in Ubuntu

Starting emulator for AVD 'Nexus'
Failed to load libGL.so
Failed to allocate 2147483648 B: Cannot allocate memory
error libGL.so: cannot open shared object file: No such file or directory
Failed to load libGL.so
error libGL.so: cannot open shared object file: No such file or directory


Two ways to fix the problem:

1st: Create a symbolic link or soft link to /usr folder
  Command: ln -s /usr/lib/libGL.so.1 /tools/lib/libGL.so 
2nd: Install the OpenGL driver
  Command: sudo apt-get install libgl1-mesa-dev

Friday, January 10, 2014

Eclipse Indigo - Ubuntu 12.04 Failed To Open Error: swt/lib/linux/x86/libswt-gtk-3740.so

After installing Eclipse Indigo in Ubuntu Desktop 12.04, the Eclipse failed to start. An error message box displayed:

To fix the problem, simply create a symbolic link into your home folder. Use the command below:

For Ubuntu 12.04 32 bit: 
   ln -s /usr/lib/jni/libswt-* ~/.swt/lib/linux/x86/
For Ubuntu 12.04 64 bit: 
   ln -s /usr/lib/jni/libswt-* ~/.swt/lib/linux/x86_64/

If you have questions, please leave a comment(s).