Friday, March 30, 2018

How To? Mule 4 - 2Way SSL (Two Way SSL) for Anypoint MuleSoft CloudHub or OnPrem

Easy steps on how to integrate 2Way SSL to your MuleSoft Application:

Six easy steps to configure the 2Way SSL:


Note: Hostname or IP must match exactly to make sure it's a valid SSL.

Step 1:
keytool -noprompt -validity 365 -genkey -v -alias server -keyalg RSA -keystore ../ssl/server.keystore -dname "CN=org.api360.apps.ssl,OU=IT,O=arnado,L=KS,ST=Manila,c=cn" -storepass password123 -keypass password123
Step 2:
keytool -noprompt -validity 365 -genkeypair -v -alias client -keyalg RSA -storetype PKCS12 -keystore ../ssl/client.p12 -dname "CN=clientCN,OU=clientOU,O=arnado,L=devLaptop,ST=Manila,c=cn" -storepass password123 -keypass password123
Step 3:
keytool -noprompt -export -v -alias client -keystore ../ssl/client.p12 -storetype PKCS12 -storepass password123 -rfc -file ../ssl/client.cer
Step 4:
keytool -noprompt -export -v -alias server -keystore ../ssl/server.keystore -storepass password123 -rfc -file ../ssl/server.cer
Step 5:
keytool -noprompt -import -v -alias server -file ../ssl/server.cer -keystore ../ssl/client.truststore -storepass password123
Step 6:
keytool -noprompt -import -v -alias client -file ../ssl/client.cer -keystore ../ssl/server.keystore -storepass password123

I've run the steps and have provided an expected or similar output using Console (MacOS)

Step 1
keytool -noprompt -validity 365 -genkey -v -alias server -keyalg RSA -keystore ../ssl/server.keystore -dname "CN=org.api360.apps.ssl,OU=IT,O=arnado,L=KS,ST=Manila,c=cn" -storepass pA5sw0rd2018 -keypass pAs5w0rd2018
---
Output:
---
Generating 2,048 bit RSA key pair and self-signed certificate (SHA256withRSA) with a validity of 365 days
for: CN=org.api360.apps.ssl, OU=IT, O=arnado, L=KS, ST=Manila, C=cn
[Storing ../ssl/server.keystore]

Warning:
The JKS keystore uses a proprietary format. It is recommended to migrate to PKCS12 which is an industry standard format using "keytool -importkeystore -srckeystore ../ssl/server.keystore -destkeystore ../ssl/server.keystore -deststoretype pkcs12".
---

Step 2
keytool -noprompt -validity 365 -genkeypair -v -alias client -keyalg RSA -storetype PKCS12 -keystore ../ssl/client.p12 -dname "CN=cnClient,OU=ouClient,O=arnado,L=VirtualDev,ST=Manila,c=cn" -storepass pA5sw0rd2018 -keypass pAs5w0rd2018
---
Output
---
Warning:  Different store and key passwords not supported for PKCS12 KeyStores. Ignoring user-specified -keypass value.
Generating 2,048 bit RSA key pair and self-signed certificate (SHA256withRSA) with a validity of 365 days
for: CN=cnClient, OU=ouClient, O=arnado, L=VirtualDev, ST=Manila, C=cn
[Storing ../ssl/client.p12]
---

Step 3
keytool -noprompt -export -v -alias client -keystore ../ssl/client.p12 -storetype PKCS12 -storepass pA5sw0rd2018 -rfc -file ../ssl/client.cer
---
Output
---
Certificate stored in file <../ssl/client.cer>
---

Step 4
keytool -noprompt -export -v -alias server -keystore ../ssl/server.keystore -storepass pA5sw0rd2018 -rfc -file ../ssl/server.cer
---
Output
---
Certificate stored in file <../ssl/server.cer>

Warning:
The JKS keystore uses a proprietary format. It is recommended to migrate to PKCS12 which is an industry standard format using "keytool -importkeystore -srckeystore ../ssl/server.keystore -destkeystore ../ssl/server.keystore -deststoretype pkcs12".
---

Step 5
keytool -noprompt -import -v -alias server -file ../ssl/server.cer -keystore ../ssl/client.truststore -storepass pA5sw0rd2018
---
Output
---
Certificate was added to keystore
[Storing ../ssl/client.truststore]
---

Step 6
keytool -noprompt -import -v -alias client -file ../ssl/client.cer -keystore ../ssl/server.keystore -storepass pA5sw0rd2018
---
Output
---
Certificate was added to keystore
[Storing ../ssl/server.keystore]

Warning:
The JKS keystore uses a proprietary format. It is recommended to migrate to PKCS12 which is an industry standard format using "keytool -importkeystore -srckeystore ../ssl/server.keystore -destkeystore ../ssl/server.keystore -deststoretype pkcs12".


Monday, January 15, 2018

Side Track: Send Money To Philippines No Fee or Lower Fee for Instance Send http://remit.ly/1vs5eot

Hi,

I know this is not a tech topic but I just want to share my experience when sending money and cheap and easy.

I found Remitly site as an alternative of Xoom. I've been a Xoom customer but it seems, there fee is high and their exchange rate is low.

I'm not paid to promote either Remitly or Xoom. I am just sharing my thought to the world on how you can save. To cut the story short, I found Remitly as way cheaper with the same services that Xoom does but Remitly is free when you send it and use your checking account. But, if you want to send an instant money, you can use Debit with lower fee and better exchange rate than Xoom.

Anyway, you can compare it by yourself but if you want to enroll or sign-up to Remitly please use the link http://remit.ly/1vs5eot because to tell you honestly, I will get a credit too. Once you sign-up, try to invite your circle of friends too and you will get a credit as well. The more the merrier.

Again "please / paki / palihug lang / mabalin" click or use the link http://remit.ly/1vs5eot

Thank you and Happy 2018!

Friday, October 20, 2017

How To Configure Multiple Sub Domain in NGINX?

While creating my own Virtual Box CI/CD which include Jenkins, Artifactory and Git, I noticed that I need to have multiple ports for each application, so I decided to use NGINX to be my proxy server.

First, I set my DNS or in my local machine, I added an alias into my local (MacOS) /etc/hosts file

myadmin@myHostOS$: sudo nano /etc/hosts
# Add the following host aliases

192.168.1.101 interface101.vbox
192.168.1.101 artifactory.interface101.vbox
192.168.1.101 jenkins.interface101.vbox
192.168.1.101 git.interface101.vbox

# Save

I login to my Virtual Box instance that has the nginx in it.

You can have one file for all the configuration or you can have one for each sub-domain-configuration. I prefer one for each:


Step 1) Lets create the git configuration

admin@myGuestOS:$ sudo nano /etc/nginx/site-available/git-interface101-vbox.conf
# Add the following config
server {
  listen 80:
  server_name git.interface101.vbox;
  location / {
     proxy_set_header X-Forwarded-For $proxy_add_x_forwarded_for;
     proxy_set_header Host $http_host;
     proxy_pass http://127.0.0.1:10112/; # Note: 10112 is the Git port
  }
}  
# Save

After saving the file, let's create a soft link in sites-enabled
admin@myGuestOS:$ ln -sf /etc/nginx/site-available/git-interface101-vbox.conf /etc/nginx/site-enabled/git-interface101-vbox.conf

Step 2) Lets create the artifactory configuration:

admin@myGuestOS:$ sudo nano /etc/nginx/site-available/artifactory-interface101-vbox.conf
# Add the following config
server {
  listen 80:
  server_name artifactory.interface101.vbox;
  location / {
     proxy_set_header X-Forwarded-For $proxy_add_x_forwarded_for;
     proxy_set_header Host $http_host;
     proxy_pass http://127.0.0.1:8081/; # Note: 8081 is the Artifactory port
  }
}  
# Save 

After saving the file, let's create a soft link in sites-enabled
admin@myGuestOS:$ ln -sf /etc/nginx/site-available/artifactory-interface101-vbox.conf /etc/nginx/site-enabled/artifactory-interface101-vbox.conf

Step 3) Lets create the Jenkins configuration:

admin@myGuestOS:$ sudo nano /etc/nginx/site-available/jenkins-interface101-vbox.conf
# Add the following config
server {
  listen 80:
  server_name jenkins.interface101.vbox;
  location / {
     proxy_set_header X-Forwarded-For $proxy_add_x_forwarded_for;
     proxy_set_header Host $http_host;
     proxy_pass http://127.0.0.1:8080/; # Note: 8080 is the Jenkins port
  }
}
# Save 

After saving the file, let's create a soft link in sites-enabled
admin@myGuestOS:$ ln -sf /etc/nginx/site-available/jenkins-interface101-vbox.conf /etc/nginx/site-enabled/jenkins-interface101-vbox.conf

Step 4) Lets restart the nginx service
admin@myGuestOS:$ sudo service nginx restart

Step 5) Lets verify the URL now.

From your Host OS, open a browser and visit the following URL:

http://artifactory.interface101.vbox for Artifactory
http://jenkins.interface101.vbox for Jenkins
http://git.interface101.vbox for Git

Note: Make sure Artifactory, Jenkins and Git are running before you visit their URL

Have fun and enjoy!

Cheers!

Thursday, April 13, 2017

DataWeave 101!

DataWeave! DataWeave! DataWeave! It's fun to do dataweaving....

How to create a lookup function in DataWeave?

%var gendertable = { "Male": "M", "Female": "F", "Unknown": "U"}
- - -
...
genderCode: gendertable[payload.inputGender]
...

How to display a data with a valid xml descriptor?

Input:
<root>
    <Address>
        <country>USA</country>
        <type>
            <reference descriptor="Home">nvm</reference>
        </type>
    </Address>
    <Address>
        <country>PH</country>
        <type>
            <reference descriptor="Work">nvm</reference>
        </type>
    </Address>
</root>

Transform:

Option 1 =

%dw 1.0
%output application/json
---
payload.root.*Address map (
      { homeCountry: $.country } when $.type.reference.@descriptor == "Home" otherwise { homeCountry: "" }
)

Option 2 =

(
  payload.root.*Address 
    filter $.type.reference.@descriptor == 'Home' 
    map {
      homeCountry: $.country
    }
)[0]

Output:

{
    "homeCountry" : "USA"
}


How to use the value to be the key?

Input:

<ns6:ProductListResponse xmlns:ns5="http://www.twcable.com/common/types/v1x0"
  xmlns:ns6="http://www.twcable.com/soa/types/csg/v2x21">
         <ns6:Business>
            <ns6:BusinessUnit>815020000070</ns6:BusinessUnit>
         </ns6:Business>
         <ns6:ProductList>
            <ns6:Count>2</ns6:Count>
            <ns6:Product>
               <ns6:Code>$F</ns6:Code>
               <ns6:AvailableCatalogIdentifier>60060840415</ns6:AvailableCatalogIdentifier>
               <ns6:CatalogIdentifier>600606044</ns6:CatalogIdentifier>
               <ns6:ChildCount>2</ns6:ChildCount>
               <ns6:ParameterCount>1</ns6:ParameterCount>
               <ns6:Parameter>
                  <ns6:Identifier>6006060093417</ns6:Identifier>
                  <ns6:Name>FROM_REFERENCE_NAME</ns6:Name>
                  <ns6:DomainDefinition>N</ns6:DomainDefinition>
               </ns6:Parameter>
            </ns6:Product>
            <ns6:Product>
               <ns6:Code>$H</ns6:Code>
               <ns6:AvailableCatalogIdentifier>60060840416</ns6:AvailableCatalogIdentifier>
               <ns6:CatalogIdentifier>600606045</ns6:CatalogIdentifier>
               <ns6:ParameterCount>2</ns6:ParameterCount>
               <ns6:Parameter>
                  <ns6:Identifier>6006060093453</ns6:Identifier>
                  <ns6:Name>RSTRCT CALLER ID</ns6:Name>
               </ns6:Parameter>
               <ns6:Parameter>
                  <ns6:Identifier>6006060093446</ns6:Identifier>
                  <ns6:Name>BLOCK 900/976</ns6:Name>
                </ns6:Parameter>
           </ns6:Product>
       </ns6:ProductList>
</ns6:ProductListResponse>

Transform:

%dw 1.0
%output application/java
%var products = payload.ProductListResponse.ProductList.*Product
---
{
  Status:"Success",
  Response: {(
    products map {
      ($.CatalogIdentifier): {($.*Parameter map {
          ($.Name): $.Identifier
        }
      )}
    }
  )}
}

Output:

Status:"Success",
Response:{
  600606044 : {
    "FROM_REFERENCE_NAME","6006060093417"
  },
  600606045 : {
    "RSTRCT CALLER ID":"6006060093453",
    "BLOCK 900/976":"6006060093446"
  }
}


How can I filter the objects where "UniqueId": "0"

{
    Header: {
        MsgId: flowVars.msgCId,
        Key: flowVars.key
    },
    Data: {
        Addresses: 
payload.ns0#GetCustomerDataResponse.ns0#OCust.*ns0#OCadRecord[?($.ns0#OCAddrId != "0")]
 map ((oCadRecord , indexOfOCadRecord) -> {
            Type: oCadRecord.ns0#OCAddrUsageCd,
            DescriptionOfOther: oCadRecord.ns0#OCAddrDesc,
            CountryCd: oCadRecord.ns0#OCCntryCd,
            Line1: oCadRecord.ns0#OCStAddrTx,
            Line2: oCadRecord.ns0#OCStAddr2Tx,
            Line3: oCadRecord.ns0#OCStAddr3Tx,
            City: oCadRecord.ns0#OCAddrCityNm,
            State: oCadRecord.ns0#OCAddrStateCd,
            Zip: oCadRecord.ns0#OCPostalCd,
            Zip4: oCadRecord.ns0#OCUsZipSuffCd,
            UniqueId: oCadRecord.ns0#OCAddrId
        })
    }
}


MuleSoft MUnit Cheatsheet!

MUnit!

How to Set Inbound Parameter?

<munit:set payload="#[]" doc:name="Set Message">
   <munit:inbound-properties>
       <munit:inbound-property key="http.query.params" value="#[['param':'a-param']]"/>
   </munit:inbound-properties>
</munit:set>


Sunday, January 1, 2017

Dreamweaver CS 6 not able to run in MacOS using latest JDK 1.7

I have updated my JDK on my MacOS using JDK 1.8.x, unfortunately, my Dreamweaver CS 6 stopped working, but, I found a solution,

Just download and install the patch from Apple

https://support.apple.com/kb/DL1572?locale=en_US

Good luck and happy dreamweavering!

Thursday, March 10, 2016

MuleSoft - How To Implement HTTP Listener Basic Authentication?

I've been looking for a simple example on how to implement a Basic Authentication HTTP Listener.

First step: I went through this docs https://docs.mulesoft.com/mule-user-guide/v/3.7/component-authorization-using-spring-security but I just need a very simple and straightforward.

Second step: I just created a simple one. Please refer the below on how I did it:

Let's create a new Mule Project:
name: poc-http-basic-authentication

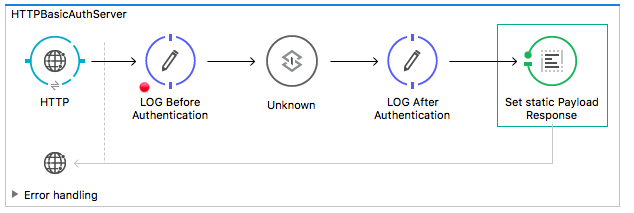
Step 1: Let's just create a a flow and name it with "HTTPBasicAuthServer" and then just add a HTTP Listener then set a payload response. That's it.

Step 2: Let's define a spring beans. Use the code snippet below:

 <spring:beans>
    <ss:authentication-manager alias="authenticationManager">
      <ss:authentication-provider>
        <ss:user-service id="userService">
          <ss:user name="admin" password="admin" authorities="ROLE_ADMIN" />
        </ss:user-service>
      </ss:authentication-provider>
    </ss:authentication-manager> 

  </spring:beans>

Step 3: Add the following security-manager config:

  <mule-ss:security-manager>
      <mule-ss:delegate-security-provider name="memory-provider" delegate-ref="authenticationManager"/>

  </mule-ss:security-manager>

Step 4: Open the configuration XML and look for the flow "HTTPBasicAuthServer". Add the "basic-security-filter" config in between the HTTP Listener and the Set Payload.


  <http:basic-security-filter realm="mule-realm" securityProviders="memory-provider"/> 

Step 5: Save it and run.

Full Source Code below:

<mule xmlns:tls="http://www.mulesoft.org/schema/mule/tls" xmlns:http="http://www.mulesoft.org/schema/mule/http" xmlns:tracking="http://www.mulesoft.org/schema/mule/ee/tracking" xmlns="http://www.mulesoft.org/schema/mule/core" xmlns:doc="http://www.mulesoft.org/schema/mule/documentation"
    xmlns:spring="http://www.springframework.org/schema/beans" 
    xmlns:xsi="http://www.w3.org/2001/XMLSchema-instance"
    xmlns:mule-ss="http://www.mulesoft.org/schema/mule/spring-security"
    xmlns:ss="http://www.springframework.org/schema/security"
    xsi:schemaLocation="http://www.springframework.org/schema/beans http://www.springframework.org/schema/beans/spring-beans-current.xsd
http://www.mulesoft.org/schema/mule/core http://www.mulesoft.org/schema/mule/core/current/mule.xsd
http://www.mulesoft.org/schema/mule/http http://www.mulesoft.org/schema/mule/http/current/mule-http.xsd
http://www.mulesoft.org/schema/mule/ee/tracking http://www.mulesoft.org/schema/mule/ee/tracking/current/mule-tracking-ee.xsd
http://www.mulesoft.org/schema/mule/spring-security http://www.mulesoft.org/schema/mule/spring-security/3.1/mule-spring-security.xsd
http://www.springframework.org/schema/security http://www.springframework.org/schema/security/spring-security-3.0.xsd
http://www.mulesoft.org/schema/mule/tls http://www.mulesoft.org/schema/mule/tls/current/mule-tls.xsd
http://www.springframework.org/schema/beans http://www.springframework.org/schema/beans/spring-beans-3.0.xsd
http://www.mulesoft.org/schema/mule/https http://www.mulesoft.org/schema/mule/https/current/mule-https.xsd">

  <spring:beans>
    <ss:authentication-manager alias="authManager">
      <ss:authentication-provider>
        <ss:user-service id="userService">
          <ss:user name="admin" password="password1" authorities="ROLE_ADMIN" />
        </ss:user-service>
      </ss:authentication-provider>
    </ss:authentication-manager> 
  </spring:beans>

  <mule-ss:security-manager>
      <mule-ss:delegate-security-provider name="auth-provider" delegate-ref="authManager"/>
  </mule-ss:security-manager>

  <http:listener-config name="HTTP_Listener_Configuration" host="0.0.0.0" port="8081" doc:name="HTTP Listener Configuration" />
    

  <flow name="HTTPBasicAuthServer">
    <http:listener config-ref="HTTP_Listener_Configuration" path="server" doc:name="HTTP"/>
      <logger level="INFO" message=">>>> Before Authentication" doc:name="LOG Before Authentication"/>
    <http:basic-security-filter realm="mule-realm" securityProviders="auth-provider"/>      
    <logger level="INFO" message=">>>> Granted and After Authentication" doc:name="LOG After Authentication"/>
      <set-payload value="Success" doc:name="Set static Payload Response"/>
  </flow>

</mule>


Sunday, February 14, 2016

Disable Login List in Redhat

To Enable:

gconftool-2 --direct --config-source=xml:readwrite:/etc/gconf/gconf.xml.defaults --type bool --set /apps/gdm/simple-greeter/disable_user_list true

To Disable:

# gconftool-2 --direct --config-source=xml:readwrite:/etc/gconf/gconf.xml.defaults --type bool --set /apps/gdm/simple-greeter/disable_user_list false

---

Thursday, December 17, 2015

After updating my Mac OS El Capitan, my Seagate External HDD is now READ-ONLY mode. OMG!

Let's try to make this short:

Before updating my El Capitan, I was able to Write/Delete/Read on my Seagate 1TB External USB HDD disk. After updating my Mac OS El Capitan, I am not able to Write Move Delete any files or folder in my Seagate 1TB External USB HDD.

Okay, let's make it work now. All you need to do is to download the file that can be found at Seagate website. You don't need to buy it even if it's from Paragon https://www.paragon-software.com/home/ntfs-mac/. Basically, when you go to Paragon site, you need to purchase it or you can try it for 10 days.

Since you already bought the Seagate and it was working before the update, all you need is download the version from Seagate Site which is this link http://www.seagate.com/support/downloads/item/ntfs-driver-for-mac-os-master-dl and of course you need to click the I Accept

Taaadddaaa!!!! Now click the Download.

Note before Installing it MAKE SURE THAT YOUR SEAGATE HDD is ATTACHED to your COMPUTER, and then now INSTALL IT. After installing the NTFS_for_Mac_14.0.456.dmg file. It requires you to RESTART your Mac system.

Good luck and happy Seagate... ing!

Monday, October 5, 2015

Safari browser very slow loading page in Mac OS - El Capitan

Sometimes when loading a page using Safari in my Mac OS El Capitan, it won't load at all and even when using the Chrome browser. You can make it work again by doing any of the option I have listed below:

1st Option (Turn-off and On the current WiFi or Restart it): Right click on the Wifi icon at the top right of your screen and click Turn Off then Turn On. If you want to keep doing this approach, you can create an alias in your profile "~/.bash_profile" bash and restart it by opening a terminal and execute the command. Follow the step below on how to add an alias into your profile:

Open a terminal  ⌘+space and type the following command and restart your Terminal again

echo "alias restart_wifi='sudo ifconfig en0 down && sudo ifconfig en0 up'" >> ~/.bash_profile

After executing the command above, use the command "restart_wifi" from your Terminal to actually restart the WiFi from Terminal/Console


2nd Option (Flush the DNS): Open a terminal  ⌘+space and type the following command:

sudo dscacheutil -flushcache; sudo killall -HUP mDNSResponder;


Thursday, October 1, 2015

How To Enable the Write / Create Folder to you USB NTFS External Disk in MacBook MacOS?

Very easy step on how to allow you to create folder or copy file from MacBook to your USB NTFS drive. This is a simple hack or trick for your MacOS to allow you to write to your USB drive which you always used in Windows OS or the drive that you just bought in the store and pre-formatted for Windows OS.

Let's do it!

open a terminal in your MacOS

0) Enter the following command (Use nano editor):


sudo nano /etc/fstab

Friday, September 18, 2015

Change the default screenshot location for Mac OS

How to change the default screenshot location for Mac?

If you noticed that when taking a screenshot on your Mac desktop, all the screenshot files will be save into your Desktop as Mac default setup. That case, it will make a mess on your Dekstop layout. The way I organized it, is I changed the default screenshot location and just store it in a folder or different location. To do it, you only need three step

Step 1: Open Terminal Window
  • Open a Terminal by pressing ⌘ + space and type "Terminal" or Click "Launchpad" and type "Terminal" 

Step 2: Set the new location
  • Type the following command: 
  • defaults write com.apple.screencapture location <fullpath>
Example:

defaults write com.apple.screencapture location /Users/guest/screen

Step 3: Commit the new location to System UI
  • Type the following command: 
  • killall SystemUIServer


Friday, July 10, 2015

My Attempt Of Parsing an Information from Log Files in Linux or in z/OS Unix

My first attempt of parsing an information from a huge log files. I have created a unix script just to extract the information from within a range in a Linux or a Unix environment.

1st: I created a file in unix /usr/bin/parse.
  • Command: sudo nano /usr/bin/parse
  • Copy the script below and paste it in the newly create parse file

2nd: Make the /usr/bin/parse executable.
  • Command: sudo chmod ug+rwx,o+rx /usr/bin/parse

Script for parsing:


#!/bin/bash
# parse - will dump or tail a file between range from and to
# regular expression to validate if the input is number
re='^[0-9]+$'
if [ "$#" -eq 0 ]; then
  read -p "Please enter filename : " filename
  # this will check if the input for filename is empty
  if [ -z $filename ]; then
     echo "File name $filename must not be empty. Please try again"; exit 1
  fi
  # this will check if the file exist
  if [ -r $filename ]; then
     # Get the input for start range
     read -p "What line would you like to start : " startno

     if ! [[ $startno =~ $re ]] ; then
        echo "error: Start number is an invalid input" >&2; exit 1
     fi

     read -p "What line would you like to end   : " endno
     if ! [[ $endno =~ $re ]] ; then
        echo "error: End number is an invalid input" >&2; exit 1
     fi
     eval "sed -n '$startno,$endno p' $filename"
  else
     echo "File name $filename does not exist"
     exit 1
  fi
elif [ "$#" -eq 2 ]; then
  echo "$1"
  echo "$2"
  echo "awk 'NR>=$1' $2"
  eval "awk 'NR>=$1' $2"
elif [ "$#" -eq 3 ]; then
  echo "$1"
  echo "$2"
  echo "$3"
  echo "sed -n '$1,$2p' $3"
  eval "sed -n '$1,$2p' $3"
else
 echo -n "Invalid Argument. Example: parse 100 1000 myfiles.log"
fi

Sunday, April 26, 2015

"ArtifactTransferException: Failure to transfer com.sun.jmx:jmxri:jar:1.2.1", How to resolved this Maven Error?

While I was creating a maven module for my project, I noticed an Error Message in my Eclipse Problem window or when you open the POM.xml and see the Red “X” and it shows:

Multiple annotations found at this line:
                - ArtifactTransferException: Failure to transfer com.sun.jmx:jmxri:jar:1.2.1 from https://maven-repository.dev.java.net/nonav/repository was cached in the local repository, 
                 resolution will not be reattempted until the update interval of java.net has elapsed or updates are forced. Original error: Could not transfer artifact com.sun.jmx:jmxri:jar:1.2.1 from/to 
                 java.net (https://maven-repository.dev.java.net/nonav/repository): No connector available to access repository java.net (https://maven-repository.dev.java.net/nonav/repository) of type 
                 legacy using the available factories AetherRepositoryConnectorFactory, WagonRepositoryConnectorFactory
                - ArtifactTransferException: Failure to transfer com.sun.jdmk:jmxtools:jar:1.2.1 from https://maven-repository.dev.java.net/nonav/repository was cached in the local repository, 
                 resolution will not be reattempted until the update interval of java.net has elapsed or updates are forced. Original error: Could not transfer artifact com.sun.jdmk:jmxtools:jar:1.2.1 from/to 
                 java.net (https://maven-repository.dev.java.net/nonav/repository): No connector available to access repository java.net (https://maven-repository.dev.java.net/nonav/repository) of type 
                 legacy using the available factories AetherRepositoryConnectorFactory, WagonRepositoryConnectorFactory
                - Missing artifact com.sun.jdmk:jmxtools:jar:1.2.1
                - Missing artifact com.sun.jmx:jmxri:jar:1.2.1

To cut the story short, this was caused when I added the log4j 1.2.15 in my pom.xml as shown below:

      <dependency>
            <groupId>log4j</groupId>
            <artifactId>log4j</artifactId>
            <version>1.2.15</version>
      </dependency>

To fix the problem, I excluded the jdmk.jmxtools, jmxri and jms by using following code snippet for my log4j 1.2.15 dependency:

      <dependency>
            <groupId>log4j</groupId>
            <artifactId>log4j</artifactId>
            <version>1.2.15</version>
                  <exclusions>
                        <exclusion>
                              <groupId>com.sun.jdmk</groupId>
                              <artifactId>jmxtools</artifactId>
                        </exclusion>
                        <exclusion>
                              <groupId>com.sun.jmx</groupId>
                              <artifactId>jmxri</artifactId>
                        </exclusion>
                        <exclusion>
                              <groupId>javax.jms</groupId>
                              <artifactId>jms</artifactId>
                        </exclusion>
                  </exclusions>
      </dependency>

Friday, April 10, 2015

How to make 'tail' command with color in SSH or Unix

While I was debugging the logs early in the morning for an application issue, it's hard to identify which is ERROR or INFO or the CLASS that I'm looking for when you're dealing with one color (i.e. green), it's hard. When remote and tailing a logs for debugging, it's not easy especially if you have a lot of application logs writing to your file. My approach in a way to make it understandable and easy to trace, I just change the color while tailing it, so that, it's easy for me to trace which one is ERROR or even the specific text based on your keyword or the name of your Java Class You may try the following command below and you can also experiment it.

Quick notes: /INFO/ and /ERROR/ are the keyword and you can replace it.

Command below will print all line with INFO in GREEN and all line with ERROR in RED

tail -1000f <log.file>| awk '/INFO/ {print "\033[32m" $0 "\033[39m"} /ERROR/ {print "\033[31m" $0 "\033[39m"}'

Command below will print all line in WHITE except for the line with ERROR. The line with ERROR will be print in RED.

tail -1000f <log.file>| awk '// {print "\033[37m" $0 "\033[39m"} /ERROR/ {print "\033[31m" $0 "\033[39m"}'

Please post your suggestion to make this "tail" and "awk" works better.

For Colors:
            
   30 - black   34 - blue          40 - black    44 - blue
   31 - red     35 - magenta       41 - red      45 - magenta
   32 - green   36 - cyan          42 - green    46 - cyan
   33 - yellow  37 - white         43 - yellow   47 - white


Friday, January 30, 2015

To Enable Remote Command from Red Hat Central Management Portal

The latest version of the following packages needs to be installed:

up2date 
rhncfg 
rhncfg-actions 
rhncfg-client
 
The remote commands currently on the Pending actions queue can be applied immediately to the system by running the command from the command prompt:

# rhn_check

But schedule actions actually depends on rhnsd service (Red Hat Network Daemon) that periodically connects to Red Hat Network to check (rhn_check) for updates, notifications or to apply remote commands if it is configured. This service will check with RHN every 240 minutes (default). If you want to schedule your remote command to run every hour, please change the value in the file to:

/etc/sysconfig/rhn/rhnsd

INTERVAL=60

Please take note that changing this interval to less than 15 minutes will result to "Abuse of Service" error which means that the system is checking in with RHN more than the allowed number of times (100 check in per 24 hours).

After changing the INTERVAL, run this command:

# service rhnsd restart
 
Actually, to run remote commands, we only need to enable:

# rhn-actions-control --enable-run

but if you want to run config files, diffing package versions, mtime, etc., --enable-all
will be appropriate.

--enable-all will let you deploy remote commands

Wednesday, January 28, 2015

GHOST: glibc vulnerability (CVE-2015-0235) - How to fix the issue in Ubuntu and Red Hat

In Linux Ubuntu, the easy way to fix is update your library to the following version:


Follow the command below to update the Ubuntu library
  • $ sudo apt-get update
  • $ sudo apt-get dist-upgrade
In Linux Red Hat, the easiest way to resolved the issue is to update the glibc and nscd  packages on your system using the package release with the following errata: 


Thursday, January 8, 2015

What is working in IT in a non-IT Company vs an IT Software or Service Provider company?

After working in both conditions here are my observations:

Working for pure IT services company:

- I worked on many projects involved many technologies, latest and old.
- Less pressure during development since SDLC involved, sufficient time for
development. Even with agile also, I used to get much time to do things since we followed "agile way of estimating effort" 
- I used to get time to do things for my own learning, for example using JUnit ,MUnit, Mockito, writing unit test cases, doing POC, setting local dev environment using Virtual Box or VMware or Fusion and now, you can actually leverage the AWS for the cheapest t2.nano instance for almost $5 / month.
- I don't have to interact with customer directly unless I am in a big role.
- Challenging work environment and you will be on the go. 

Working for non-IT company as an IT support engineer:

- Working closely with customers (people who doesn't know technology well).
- Things changes so fast, even after project launch I used to get change requests to modify something instantly! 
- Very tight schedules and too much pressure.
- Once project goes live I used to get couple of weeks to one month free time.
- I am only working on one project, to support the users on technical issues etc. I am quite familiar with the system now and there is nothing to learn much. 
- Not so challenging, doing simple things within shortest time is challenging.

- Convincing users on certain things is difficult. Whenever we tell them that certain things cannot be done this way or that way, they immediately says "if you can't do it, why you need this computer system?"

Hard to pick which field you want to take:

To work in a IT Service company, is fun and you will envolve on different company, high expectation of course, don't afraid if you fail because the today's failure can make way for your tomorrow's triumph...

To work in IT support or in-house is kind of layback especially if your rule is supporting internal client. You can make your life busy if you want to. Make your own challenge but it's up to you. You can do that or just go with the flow.


Wednesday, August 27, 2014

How to download Java 8 or JDK 8 in Linux using WGET command

Just want to make it short: If you're using a Linux that does not have UI and want to download Java 8 or JRE 8 just follow the command below:

wget --no-check-certificate --no-cookies - --header "Cookie: oraclelicense=accept-securebackup-cookie" "http://download.oracle.com/otn-pub/java/jdk/8u20-b26/jre-8u20-linux-x64.tar.gz"

The command I listed above will simply download the Server JRE 8. You can change the URL location if you want to download a different version of JDK. To get the actual URL for the download location, open an internet browser and enter the URL "http://www.oracle.com/technetwork/java/javase/downloads/jre8-downloads-2133155.html" and right click on the download file that you want to download then click "Copy link address"


Thursday, June 26, 2014

Customized Maven Settings for Different Workspace - One Workspace Per Project

I've been looking for a solution on how to customized the maven settings for different project but there was none. So, I've created my own solution on this blog on how to do it, instead of customizing each project, I basically configure it on each workspace. My practice is one workspace for each project. This is what I have done so far:

Step 1: 
  • Open Eclipse or Springsource Tool Suite (STS) IDE
Step 2: 
  • Click Window - Preferences
Step 3: 
  • In Filter box, enter "Maven"
Step 4: 
  • Click the Installation and add the Maven home that you have in your computer. In my case I downloaded Maven 3.2.1 then extracted the TAR.GZ file to C:\Devtools\Apache\Maven\3.2.1
Step 5: 
  • Click User Settings then Browse the settings.xml file. In my case the location of the settings.xml is C:\Devtools\Apache\Maven\3.2.1\conf\settings.xml then click Update Settings and click Apply then Click OK.
That's it. That's my 5 easy steps.

Regarding changing the path of your local repository, you need to add the following code inside the settings.xml file from our maven conf directory:

<localRepository>D:/Devtools/Maven/Repository</localRepository>