Friday, March 30, 2018

How To? Mule 4 - 2Way SSL (Two Way SSL) for Anypoint MuleSoft CloudHub or OnPrem

Easy steps on how to integrate 2Way SSL to your MuleSoft Application:

Six easy steps to configure the 2Way SSL:


Note: Hostname or IP must match exactly to make sure it's a valid SSL.

Step 1:
keytool -noprompt -validity 365 -genkey -v -alias server -keyalg RSA -keystore ../ssl/server.keystore -dname "CN=org.api360.apps.ssl,OU=IT,O=arnado,L=KS,ST=Manila,c=cn" -storepass password123 -keypass password123
Step 2:
keytool -noprompt -validity 365 -genkeypair -v -alias client -keyalg RSA -storetype PKCS12 -keystore ../ssl/client.p12 -dname "CN=clientCN,OU=clientOU,O=arnado,L=devLaptop,ST=Manila,c=cn" -storepass password123 -keypass password123
Step 3:
keytool -noprompt -export -v -alias client -keystore ../ssl/client.p12 -storetype PKCS12 -storepass password123 -rfc -file ../ssl/client.cer
Step 4:
keytool -noprompt -export -v -alias server -keystore ../ssl/server.keystore -storepass password123 -rfc -file ../ssl/server.cer
Step 5:
keytool -noprompt -import -v -alias server -file ../ssl/server.cer -keystore ../ssl/client.truststore -storepass password123
Step 6:
keytool -noprompt -import -v -alias client -file ../ssl/client.cer -keystore ../ssl/server.keystore -storepass password123

I've run the steps and have provided an expected or similar output using Console (MacOS)

Step 1
keytool -noprompt -validity 365 -genkey -v -alias server -keyalg RSA -keystore ../ssl/server.keystore -dname "CN=org.api360.apps.ssl,OU=IT,O=arnado,L=KS,ST=Manila,c=cn" -storepass pA5sw0rd2018 -keypass pAs5w0rd2018
---
Output:
---
Generating 2,048 bit RSA key pair and self-signed certificate (SHA256withRSA) with a validity of 365 days
for: CN=org.api360.apps.ssl, OU=IT, O=arnado, L=KS, ST=Manila, C=cn
[Storing ../ssl/server.keystore]

Warning:
The JKS keystore uses a proprietary format. It is recommended to migrate to PKCS12 which is an industry standard format using "keytool -importkeystore -srckeystore ../ssl/server.keystore -destkeystore ../ssl/server.keystore -deststoretype pkcs12".
---

Step 2
keytool -noprompt -validity 365 -genkeypair -v -alias client -keyalg RSA -storetype PKCS12 -keystore ../ssl/client.p12 -dname "CN=cnClient,OU=ouClient,O=arnado,L=VirtualDev,ST=Manila,c=cn" -storepass pA5sw0rd2018 -keypass pAs5w0rd2018
---
Output
---
Warning:  Different store and key passwords not supported for PKCS12 KeyStores. Ignoring user-specified -keypass value.
Generating 2,048 bit RSA key pair and self-signed certificate (SHA256withRSA) with a validity of 365 days
for: CN=cnClient, OU=ouClient, O=arnado, L=VirtualDev, ST=Manila, C=cn
[Storing ../ssl/client.p12]
---

Step 3
keytool -noprompt -export -v -alias client -keystore ../ssl/client.p12 -storetype PKCS12 -storepass pA5sw0rd2018 -rfc -file ../ssl/client.cer
---
Output
---
Certificate stored in file <../ssl/client.cer>
---

Step 4
keytool -noprompt -export -v -alias server -keystore ../ssl/server.keystore -storepass pA5sw0rd2018 -rfc -file ../ssl/server.cer
---
Output
---
Certificate stored in file <../ssl/server.cer>

Warning:
The JKS keystore uses a proprietary format. It is recommended to migrate to PKCS12 which is an industry standard format using "keytool -importkeystore -srckeystore ../ssl/server.keystore -destkeystore ../ssl/server.keystore -deststoretype pkcs12".
---

Step 5
keytool -noprompt -import -v -alias server -file ../ssl/server.cer -keystore ../ssl/client.truststore -storepass pA5sw0rd2018
---
Output
---
Certificate was added to keystore
[Storing ../ssl/client.truststore]
---

Step 6
keytool -noprompt -import -v -alias client -file ../ssl/client.cer -keystore ../ssl/server.keystore -storepass pA5sw0rd2018
---
Output
---
Certificate was added to keystore
[Storing ../ssl/server.keystore]

Warning:
The JKS keystore uses a proprietary format. It is recommended to migrate to PKCS12 which is an industry standard format using "keytool -importkeystore -srckeystore ../ssl/server.keystore -destkeystore ../ssl/server.keystore -deststoretype pkcs12".


Monday, January 15, 2018

Side Track: Send Money To Philippines No Fee or Lower Fee for Instance Send http://remit.ly/1vs5eot

Hi,

I know this is not a tech topic but I just want to share my experience when sending money and cheap and easy.

I found Remitly site as an alternative of Xoom. I've been a Xoom customer but it seems, there fee is high and their exchange rate is low.

I'm not paid to promote either Remitly or Xoom. I am just sharing my thought to the world on how you can save. To cut the story short, I found Remitly as way cheaper with the same services that Xoom does but Remitly is free when you send it and use your checking account. But, if you want to send an instant money, you can use Debit with lower fee and better exchange rate than Xoom.

Anyway, you can compare it by yourself but if you want to enroll or sign-up to Remitly please use the link http://remit.ly/1vs5eot because to tell you honestly, I will get a credit too. Once you sign-up, try to invite your circle of friends too and you will get a credit as well. The more the merrier.

Again "please / paki / palihug lang / mabalin" click or use the link http://remit.ly/1vs5eot

Thank you and Happy 2018!

Friday, October 20, 2017

How To Configure Multiple Sub Domain in NGINX?

While creating my own Virtual Box CI/CD which include Jenkins, Artifactory and Git, I noticed that I need to have multiple ports for each application, so I decided to use NGINX to be my proxy server.

First, I set my DNS or in my local machine, I added an alias into my local (MacOS) /etc/hosts file

myadmin@myHostOS$: sudo nano /etc/hosts
# Add the following host aliases

192.168.1.101 interface101.vbox
192.168.1.101 artifactory.interface101.vbox
192.168.1.101 jenkins.interface101.vbox
192.168.1.101 git.interface101.vbox

# Save

I login to my Virtual Box instance that has the nginx in it.

You can have one file for all the configuration or you can have one for each sub-domain-configuration. I prefer one for each:


Step 1) Lets create the git configuration

admin@myGuestOS:$ sudo nano /etc/nginx/site-available/git-interface101-vbox.conf
# Add the following config
server {
  listen 80:
  server_name git.interface101.vbox;
  location / {
     proxy_set_header X-Forwarded-For $proxy_add_x_forwarded_for;
     proxy_set_header Host $http_host;
     proxy_pass http://127.0.0.1:10112/; # Note: 10112 is the Git port
  }
}  
# Save

After saving the file, let's create a soft link in sites-enabled
admin@myGuestOS:$ ln -sf /etc/nginx/site-available/git-interface101-vbox.conf /etc/nginx/site-enabled/git-interface101-vbox.conf

Step 2) Lets create the artifactory configuration:

admin@myGuestOS:$ sudo nano /etc/nginx/site-available/artifactory-interface101-vbox.conf
# Add the following config
server {
  listen 80:
  server_name artifactory.interface101.vbox;
  location / {
     proxy_set_header X-Forwarded-For $proxy_add_x_forwarded_for;
     proxy_set_header Host $http_host;
     proxy_pass http://127.0.0.1:8081/; # Note: 8081 is the Artifactory port
  }
}  
# Save 

After saving the file, let's create a soft link in sites-enabled
admin@myGuestOS:$ ln -sf /etc/nginx/site-available/artifactory-interface101-vbox.conf /etc/nginx/site-enabled/artifactory-interface101-vbox.conf

Step 3) Lets create the Jenkins configuration:

admin@myGuestOS:$ sudo nano /etc/nginx/site-available/jenkins-interface101-vbox.conf
# Add the following config
server {
  listen 80:
  server_name jenkins.interface101.vbox;
  location / {
     proxy_set_header X-Forwarded-For $proxy_add_x_forwarded_for;
     proxy_set_header Host $http_host;
     proxy_pass http://127.0.0.1:8080/; # Note: 8080 is the Jenkins port
  }
}
# Save 

After saving the file, let's create a soft link in sites-enabled
admin@myGuestOS:$ ln -sf /etc/nginx/site-available/jenkins-interface101-vbox.conf /etc/nginx/site-enabled/jenkins-interface101-vbox.conf

Step 4) Lets restart the nginx service
admin@myGuestOS:$ sudo service nginx restart

Step 5) Lets verify the URL now.

From your Host OS, open a browser and visit the following URL:

http://artifactory.interface101.vbox for Artifactory
http://jenkins.interface101.vbox for Jenkins
http://git.interface101.vbox for Git

Note: Make sure Artifactory, Jenkins and Git are running before you visit their URL

Have fun and enjoy!

Cheers!

Thursday, April 13, 2017

DataWeave 101!

DataWeave! DataWeave! DataWeave! It's fun to do dataweaving....

How to create a lookup function in DataWeave?

%var gendertable = { "Male": "M", "Female": "F", "Unknown": "U"}
- - -
...
genderCode: gendertable[payload.inputGender]
...

How to display a data with a valid xml descriptor?

Input:
<root>
    <Address>
        <country>USA</country>
        <type>
            <reference descriptor="Home">nvm</reference>
        </type>
    </Address>
    <Address>
        <country>PH</country>
        <type>
            <reference descriptor="Work">nvm</reference>
        </type>
    </Address>
</root>

Transform:

Option 1 =

%dw 1.0
%output application/json
---
payload.root.*Address map (
      { homeCountry: $.country } when $.type.reference.@descriptor == "Home" otherwise { homeCountry: "" }
)

Option 2 =

(
  payload.root.*Address 
    filter $.type.reference.@descriptor == 'Home' 
    map {
      homeCountry: $.country
    }
)[0]

Output:

{
    "homeCountry" : "USA"
}


How to use the value to be the key?

Input:

<ns6:ProductListResponse xmlns:ns5="http://www.twcable.com/common/types/v1x0"
  xmlns:ns6="http://www.twcable.com/soa/types/csg/v2x21">
         <ns6:Business>
            <ns6:BusinessUnit>815020000070</ns6:BusinessUnit>
         </ns6:Business>
         <ns6:ProductList>
            <ns6:Count>2</ns6:Count>
            <ns6:Product>
               <ns6:Code>$F</ns6:Code>
               <ns6:AvailableCatalogIdentifier>60060840415</ns6:AvailableCatalogIdentifier>
               <ns6:CatalogIdentifier>600606044</ns6:CatalogIdentifier>
               <ns6:ChildCount>2</ns6:ChildCount>
               <ns6:ParameterCount>1</ns6:ParameterCount>
               <ns6:Parameter>
                  <ns6:Identifier>6006060093417</ns6:Identifier>
                  <ns6:Name>FROM_REFERENCE_NAME</ns6:Name>
                  <ns6:DomainDefinition>N</ns6:DomainDefinition>
               </ns6:Parameter>
            </ns6:Product>
            <ns6:Product>
               <ns6:Code>$H</ns6:Code>
               <ns6:AvailableCatalogIdentifier>60060840416</ns6:AvailableCatalogIdentifier>
               <ns6:CatalogIdentifier>600606045</ns6:CatalogIdentifier>
               <ns6:ParameterCount>2</ns6:ParameterCount>
               <ns6:Parameter>
                  <ns6:Identifier>6006060093453</ns6:Identifier>
                  <ns6:Name>RSTRCT CALLER ID</ns6:Name>
               </ns6:Parameter>
               <ns6:Parameter>
                  <ns6:Identifier>6006060093446</ns6:Identifier>
                  <ns6:Name>BLOCK 900/976</ns6:Name>
                </ns6:Parameter>
           </ns6:Product>
       </ns6:ProductList>
</ns6:ProductListResponse>

Transform:

%dw 1.0
%output application/java
%var products = payload.ProductListResponse.ProductList.*Product
---
{
  Status:"Success",
  Response: {(
    products map {
      ($.CatalogIdentifier): {($.*Parameter map {
          ($.Name): $.Identifier
        }
      )}
    }
  )}
}

Output:

Status:"Success",
Response:{
  600606044 : {
    "FROM_REFERENCE_NAME","6006060093417"
  },
  600606045 : {
    "RSTRCT CALLER ID":"6006060093453",
    "BLOCK 900/976":"6006060093446"
  }
}


How can I filter the objects where "UniqueId": "0"

{
    Header: {
        MsgId: flowVars.msgCId,
        Key: flowVars.key
    },
    Data: {
        Addresses: 
payload.ns0#GetCustomerDataResponse.ns0#OCust.*ns0#OCadRecord[?($.ns0#OCAddrId != "0")]
 map ((oCadRecord , indexOfOCadRecord) -> {
            Type: oCadRecord.ns0#OCAddrUsageCd,
            DescriptionOfOther: oCadRecord.ns0#OCAddrDesc,
            CountryCd: oCadRecord.ns0#OCCntryCd,
            Line1: oCadRecord.ns0#OCStAddrTx,
            Line2: oCadRecord.ns0#OCStAddr2Tx,
            Line3: oCadRecord.ns0#OCStAddr3Tx,
            City: oCadRecord.ns0#OCAddrCityNm,
            State: oCadRecord.ns0#OCAddrStateCd,
            Zip: oCadRecord.ns0#OCPostalCd,
            Zip4: oCadRecord.ns0#OCUsZipSuffCd,
            UniqueId: oCadRecord.ns0#OCAddrId
        })
    }
}


MuleSoft MUnit Cheatsheet!

MUnit!

How to Set Inbound Parameter?

<munit:set payload="#[]" doc:name="Set Message">
   <munit:inbound-properties>
       <munit:inbound-property key="http.query.params" value="#[['param':'a-param']]"/>
   </munit:inbound-properties>
</munit:set>


Sunday, January 1, 2017

Dreamweaver CS 6 not able to run in MacOS using latest JDK 1.7

I have updated my JDK on my MacOS using JDK 1.8.x, unfortunately, my Dreamweaver CS 6 stopped working, but, I found a solution,

Just download and install the patch from Apple

https://support.apple.com/kb/DL1572?locale=en_US

Good luck and happy dreamweavering!

Thursday, March 10, 2016

MuleSoft - How To Implement HTTP Listener Basic Authentication?

I've been looking for a simple example on how to implement a Basic Authentication HTTP Listener.

First step: I went through this docs https://docs.mulesoft.com/mule-user-guide/v/3.7/component-authorization-using-spring-security but I just need a very simple and straightforward.

Second step: I just created a simple one. Please refer the below on how I did it:

Let's create a new Mule Project:
name: poc-http-basic-authentication

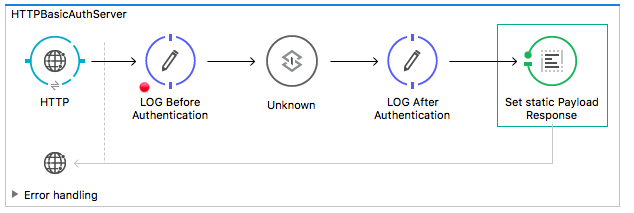
Step 1: Let's just create a a flow and name it with "HTTPBasicAuthServer" and then just add a HTTP Listener then set a payload response. That's it.

Step 2: Let's define a spring beans. Use the code snippet below:

 <spring:beans>
    <ss:authentication-manager alias="authenticationManager">
      <ss:authentication-provider>
        <ss:user-service id="userService">
          <ss:user name="admin" password="admin" authorities="ROLE_ADMIN" />
        </ss:user-service>
      </ss:authentication-provider>
    </ss:authentication-manager> 

  </spring:beans>

Step 3: Add the following security-manager config:

  <mule-ss:security-manager>
      <mule-ss:delegate-security-provider name="memory-provider" delegate-ref="authenticationManager"/>

  </mule-ss:security-manager>

Step 4: Open the configuration XML and look for the flow "HTTPBasicAuthServer". Add the "basic-security-filter" config in between the HTTP Listener and the Set Payload.


  <http:basic-security-filter realm="mule-realm" securityProviders="memory-provider"/> 

Step 5: Save it and run.

Full Source Code below:

<mule xmlns:tls="http://www.mulesoft.org/schema/mule/tls" xmlns:http="http://www.mulesoft.org/schema/mule/http" xmlns:tracking="http://www.mulesoft.org/schema/mule/ee/tracking" xmlns="http://www.mulesoft.org/schema/mule/core" xmlns:doc="http://www.mulesoft.org/schema/mule/documentation"
    xmlns:spring="http://www.springframework.org/schema/beans" 
    xmlns:xsi="http://www.w3.org/2001/XMLSchema-instance"
    xmlns:mule-ss="http://www.mulesoft.org/schema/mule/spring-security"
    xmlns:ss="http://www.springframework.org/schema/security"
    xsi:schemaLocation="http://www.springframework.org/schema/beans http://www.springframework.org/schema/beans/spring-beans-current.xsd
http://www.mulesoft.org/schema/mule/core http://www.mulesoft.org/schema/mule/core/current/mule.xsd
http://www.mulesoft.org/schema/mule/http http://www.mulesoft.org/schema/mule/http/current/mule-http.xsd
http://www.mulesoft.org/schema/mule/ee/tracking http://www.mulesoft.org/schema/mule/ee/tracking/current/mule-tracking-ee.xsd
http://www.mulesoft.org/schema/mule/spring-security http://www.mulesoft.org/schema/mule/spring-security/3.1/mule-spring-security.xsd
http://www.springframework.org/schema/security http://www.springframework.org/schema/security/spring-security-3.0.xsd
http://www.mulesoft.org/schema/mule/tls http://www.mulesoft.org/schema/mule/tls/current/mule-tls.xsd
http://www.springframework.org/schema/beans http://www.springframework.org/schema/beans/spring-beans-3.0.xsd
http://www.mulesoft.org/schema/mule/https http://www.mulesoft.org/schema/mule/https/current/mule-https.xsd">

  <spring:beans>
    <ss:authentication-manager alias="authManager">
      <ss:authentication-provider>
        <ss:user-service id="userService">
          <ss:user name="admin" password="password1" authorities="ROLE_ADMIN" />
        </ss:user-service>
      </ss:authentication-provider>
    </ss:authentication-manager> 
  </spring:beans>

  <mule-ss:security-manager>
      <mule-ss:delegate-security-provider name="auth-provider" delegate-ref="authManager"/>
  </mule-ss:security-manager>

  <http:listener-config name="HTTP_Listener_Configuration" host="0.0.0.0" port="8081" doc:name="HTTP Listener Configuration" />
    

  <flow name="HTTPBasicAuthServer">
    <http:listener config-ref="HTTP_Listener_Configuration" path="server" doc:name="HTTP"/>
      <logger level="INFO" message=">>>> Before Authentication" doc:name="LOG Before Authentication"/>
    <http:basic-security-filter realm="mule-realm" securityProviders="auth-provider"/>      
    <logger level="INFO" message=">>>> Granted and After Authentication" doc:name="LOG After Authentication"/>
      <set-payload value="Success" doc:name="Set static Payload Response"/>
  </flow>

</mule>