Thursday, March 10, 2016

MuleSoft - How To Implement HTTP Listener Basic Authentication?

I've been looking for a simple example on how to implement a Basic Authentication HTTP Listener.

First step: I went through this docs https://docs.mulesoft.com/mule-user-guide/v/3.7/component-authorization-using-spring-security but I just need a very simple and straightforward.

Second step: I just created a simple one. Please refer the below on how I did it:

Let's create a new Mule Project:
name: poc-http-basic-authentication

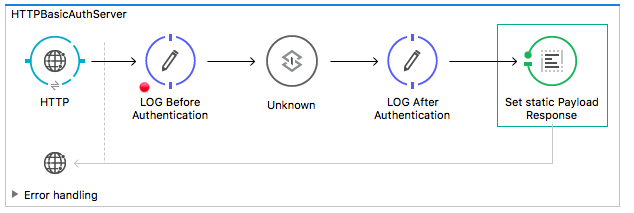
Step 1: Let's just create a a flow and name it with "HTTPBasicAuthServer" and then just add a HTTP Listener then set a payload response. That's it.

Step 2: Let's define a spring beans. Use the code snippet below:

 <spring:beans>
    <ss:authentication-manager alias="authenticationManager">
      <ss:authentication-provider>
        <ss:user-service id="userService">
          <ss:user name="admin" password="admin" authorities="ROLE_ADMIN" />
        </ss:user-service>
      </ss:authentication-provider>
    </ss:authentication-manager> 

  </spring:beans>

Step 3: Add the following security-manager config:

  <mule-ss:security-manager>
      <mule-ss:delegate-security-provider name="memory-provider" delegate-ref="authenticationManager"/>

  </mule-ss:security-manager>

Step 4: Open the configuration XML and look for the flow "HTTPBasicAuthServer". Add the "basic-security-filter" config in between the HTTP Listener and the Set Payload.


  <http:basic-security-filter realm="mule-realm" securityProviders="memory-provider"/> 

Step 5: Save it and run.

Full Source Code below:
<mule xmlns:tls="http://www.mulesoft.org/schema/mule/tls" xmlns:http="http://www.mulesoft.org/schema/mule/http" xmlns:tracking="http://www.mulesoft.org/schema/mule/ee/tracking" xmlns="http://www.mulesoft.org/schema/mule/core" xmlns:doc="http://www.mulesoft.org/schema/mule/documentation"
    xmlns:spring="http://www.springframework.org/schema/beans" 
    xmlns:xsi="http://www.w3.org/2001/XMLSchema-instance"
    xmlns:mule-ss="http://www.mulesoft.org/schema/mule/spring-security"
    xmlns:ss="http://www.springframework.org/schema/security"
    xsi:schemaLocation="http://www.springframework.org/schema/beans http://www.springframework.org/schema/beans/spring-beans-current.xsd
http://www.mulesoft.org/schema/mule/core http://www.mulesoft.org/schema/mule/core/current/mule.xsd
http://www.mulesoft.org/schema/mule/http http://www.mulesoft.org/schema/mule/http/current/mule-http.xsd
http://www.mulesoft.org/schema/mule/ee/tracking http://www.mulesoft.org/schema/mule/ee/tracking/current/mule-tracking-ee.xsd
http://www.mulesoft.org/schema/mule/spring-security http://www.mulesoft.org/schema/mule/spring-security/3.1/mule-spring-security.xsd
http://www.springframework.org/schema/security http://www.springframework.org/schema/security/spring-security-3.0.xsd
http://www.mulesoft.org/schema/mule/tls http://www.mulesoft.org/schema/mule/tls/current/mule-tls.xsd
http://www.springframework.org/schema/beans http://www.springframework.org/schema/beans/spring-beans-3.0.xsd
http://www.mulesoft.org/schema/mule/https http://www.mulesoft.org/schema/mule/https/current/mule-https.xsd">

  <spring:beans>
    <ss:authentication-manager alias="authManager">
      <ss:authentication-provider>
        <ss:user-service id="userService">
          <ss:user name="admin" password="password1" authorities="ROLE_ADMIN" />
        </ss:user-service>
      </ss:authentication-provider>
    </ss:authentication-manager> 
  </spring:beans>

  <mule-ss:security-manager>
      <mule-ss:delegate-security-provider name="auth-provider" delegate-ref="authManager"/>
  </mule-ss:security-manager>

  <http:listener-config name="HTTP_Listener_Configuration" host="0.0.0.0" port="8081" doc:name="HTTP Listener Configuration" />
    

  <flow name="HTTPBasicAuthServer">
    <http:listener config-ref="HTTP_Listener_Configuration" path="server" doc:name="HTTP"/>
      <logger level="INFO" message=">>>> Before Authentication" doc:name="LOG Before Authentication"/>
    <http:basic-security-filter realm="mule-realm" securityProviders="auth-provider"/>      
    <logger level="INFO" message=">>>> Granted and After Authentication" doc:name="LOG After Authentication"/>
      <set-payload value="Success" doc:name="Set static Payload Response"/>
  </flow>

</mule>


Sunday, February 14, 2016

Disable Login List in Redhat

To Enable:

gconftool-2 --direct --config-source=xml:readwrite:/etc/gconf/gconf.xml.defaults --type bool --set /apps/gdm/simple-greeter/disable_user_list true

To Disable:

# gconftool-2 --direct --config-source=xml:readwrite:/etc/gconf/gconf.xml.defaults --type bool --set /apps/gdm/simple-greeter/disable_user_list false

---

Thursday, December 17, 2015

After updating my Mac OS El Capitan, my Seagate External HDD is now READ-ONLY mode. OMG!

Let's try to make this short:

Before updating my El Capitan, I was able to Write/Delete/Read on my Seagate 1TB External USB HDD disk. After updating my Mac OS El Capitan, I am not able to Write Move Delete any files or folder in my Seagate 1TB External USB HDD.

Okay, let's make it work now. All you need to do is to download the file that can be found at Seagate website. You don't need to buy it even if it's from Paragon https://www.paragon-software.com/home/ntfs-mac/. Basically, when you go to Paragon site, you need to purchase it or you can try it for 10 days.

Since you already bought the Seagate and it was working before the update, all you need is download the version from Seagate Site which is this link http://www.seagate.com/support/downloads/item/ntfs-driver-for-mac-os-master-dl and of course you need to click the I Accept

Taaadddaaa!!!! Now click the Download.

Note before Installing it MAKE SURE THAT YOUR SEAGATE HDD is ATTACHED to your COMPUTER, and then now INSTALL IT. After installing the NTFS_for_Mac_14.0.456.dmg file. It requires you to RESTART your Mac system.

Good luck and happy Seagate... ing!

Monday, October 5, 2015

Safari browser very slow loading page in Mac OS - El Capitan

Sometimes when loading a page using Safari in my Mac OS El Capitan, it won't load at all and even when using the Chrome browser. You can make it work again by doing any of the option I have listed below:

1st Option (Turn-off and On the current WiFi or Restart it): Right click on the Wifi icon at the top right of your screen and click Turn Off then Turn On. If you want to keep doing this approach, you can create an alias in your profile "~/.bash_profile" bash and restart it by opening a terminal and execute the command. Follow the step below on how to add an alias into your profile:

Open a terminal  ⌘+space and type the following command and restart your Terminal again

echo "alias restart_wifi='sudo ifconfig en0 down && sudo ifconfig en0 up'" >> ~/.bash_profile

After executing the command above, use the command "restart_wifi" from your Terminal to actually restart the WiFi from Terminal/Console


2nd Option (Flush the DNS): Open a terminal  ⌘+space and type the following command:

sudo dscacheutil -flushcache; sudo killall -HUP mDNSResponder;


Thursday, October 1, 2015

How To Enable the Write / Create Folder to you USB NTFS External Disk in MacBook MacOS?

Very easy step on how to allow you to create folder or copy file from MacBook to your USB NTFS drive. This is a simple hack or trick for your MacOS to allow you to write to your USB drive which you always used in Windows OS or the drive that you just bought in the store and pre-formatted for Windows OS.

Let's do it!

open a terminal in your MacOS

0) Enter the following command (Use nano editor):


sudo nano /etc/fstab

Friday, September 18, 2015

Change the default screenshot location for Mac OS

How to change the default screenshot location for Mac?

If you noticed that when taking a screenshot on your Mac desktop, all the screenshot files will be save into your Desktop as Mac default setup. That case, it will make a mess on your Dekstop layout. The way I organized it, is I changed the default screenshot location and just store it in a folder or different location. To do it, you only need three step

Step 1: Open Terminal Window
  • Open a Terminal by pressing ⌘ + space and type "Terminal" or Click "Launchpad" and type "Terminal" 

Step 2: Set the new location
  • Type the following command: 
  • defaults write com.apple.screencapture location <fullpath>
Example:

defaults write com.apple.screencapture location /Users/guest/screen

Step 3: Commit the new location to System UI
  • Type the following command: 
  • killall SystemUIServer


Friday, July 10, 2015

My Attempt Of Parsing an Information from Log Files in Linux or in z/OS Unix

My first attempt of parsing an information from a huge log files. I have created a unix script just to extract the information from within a range in a Linux or a Unix environment.

1st: I created a file in unix /usr/bin/parse.
  • Command: sudo nano /usr/bin/parse
  • Copy the script below and paste it in the newly create parse file

2nd: Make the /usr/bin/parse executable.
  • Command: sudo chmod ug+rwx,o+rx /usr/bin/parse

Script for parsing:


#!/bin/bash
# parse - will dump or tail a file between range from and to
# regular expression to validate if the input is number
re='^[0-9]+$'
if [ "$#" -eq 0 ]; then
  read -p "Please enter filename : " filename
  # this will check if the input for filename is empty
  if [ -z $filename ]; then
     echo "File name $filename must not be empty. Please try again"; exit 1
  fi
  # this will check if the file exist
  if [ -r $filename ]; then
     # Get the input for start range
     read -p "What line would you like to start : " startno

     if ! [[ $startno =~ $re ]] ; then
        echo "error: Start number is an invalid input" >&2; exit 1
     fi

     read -p "What line would you like to end   : " endno
     if ! [[ $endno =~ $re ]] ; then
        echo "error: End number is an invalid input" >&2; exit 1
     fi
     eval "sed -n '$startno,$endno p' $filename"
  else
     echo "File name $filename does not exist"
     exit 1
  fi
elif [ "$#" -eq 2 ]; then
  echo "$1"
  echo "$2"
  echo "awk 'NR>=$1' $2"
  eval "awk 'NR>=$1' $2"
elif [ "$#" -eq 3 ]; then
  echo "$1"
  echo "$2"
  echo "$3"
  echo "sed -n '$1,$2p' $3"
  eval "sed -n '$1,$2p' $3"
else
 echo -n "Invalid Argument. Example: parse 100 1000 myfiles.log"
fi